|
1. |
First things first.
ISOLATE YOUR WATER SUPPLY. If you don't turn off
your supply to the tap you may have quite a flood to
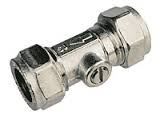
deal with. Remember, the part you are about to
remove is holding back the water supply. If you are
fortunate enough to have inline service valves
(illustrated right) then a simple quarter turn on
the screwdriver slot will do the job (when the slot
is in line with the pipe the valve is open). If you
don't have service valves you will need to isolate
supplies by other means (stop cocks, etc.) If you
are working on the hot tap on a gravity system this
might involve draining down the header tank in the
loft. |
 |
| |
Good advice: If you don't have inline service valves
now is a good time to put some in. They only cost a
few pence and have compression fittings, making them
easy to fit. Once there, you'll find routine
maintenance easy in the future. |
|
2. |
Taps are both
functional and decorative. Somebody will have spent
time and money creating an aesthetically pleasing
look. You really don't want to go and damage the tap
body and it's shiny finish in your haste or
frustration to change the internals. Always protect
the surface finish of the tap. This can be done in a
number or ways... masking tape, rags, tissues
etc - whatever is appropriate to the forces you
might need to exert on the item. |
|
3. |
When you begin pulling
your tap about remember it is connected to a pipe.
If you dislodge the tap from it's normal position it
is possible you will have twisted it in the
connection to its supply. This can damage or weaken
connection and occasion a leak. You may of course
have flexible hoses between pipe and tap, but still
be cautious about damaging the sink. |
|
4. |
There are countless
tap designs. The internals can be hidden from view
by various means - covers and shrouds often unscrew
to reveal the valve (usually made of brass). There
are way too many variations to list so examine your
tap and use your imagination. Taps can be individual
or combined to form a mixer (two taps/one spout).
With the latter, some will have hot and cold knobs
or levers, others may have a single level with
multiple function (lift for flow/left or right for
temp). Exposing the internals (the valve itself) can
be half the trick (remember covers can also become
stuck and gummed up). We shall assume you have found
the right way and can now proceed. |
|
5. |
The brass valve you
need to remove might unscrew without much drama - if
you're lucky! More often, you'll find the item has
been in situ for years and will need a bit of
encouragement (also referred to as 'brute force').
This is where you must be careful not to cause
damage elsewhere. Grips used to hold the tap body
while you tug on the spanner trying to free the
valve can ruin the finish or damage threads. The
force required to loosen the valve may twist the tap
out of position causing issues with joints or damage
to the sink. If you can get the valve out then you
are 9/10ths there and fitting a new unit will only
take you a few moments more. If you can't, then
'other means' might be appropriate. |
|
6. |
It doesn't hurt to try
freeing a stuck valve body with a little lubricant
or penetrating fluid (such as WD40 or such like). If
you seem to have come up against an immoveable
object you might need to tackle the job differently.
Sometimes, to avoid causing damage to everything
else, it pays to remove the tap or mixer from the
sink entirely and perform your repairs out of situ.
This might sound daunting, but in reality a tap is
quite easy to remove and refit - simply undoing the
water connection with a spanner and undoing the
nut/s holding the tap still. Doing so can make this
job so much easier and help avoid collateral damage. |
|
7. |
Always remain mindful
of damaging the finish on your tap or parts that are
threaded. Even if you remove the tap from the sink
you still have to grip it, so let's not spoil things
now. |
|
8. |
There is always the
possibility that you cannot budge the valve no
matter what you try - unlikely, but possible. Then
of course, you might remove the valve body and find
that there is physical damage to the valve seat
within the casting of the tap body (inspect for
small divot/s in surface of the seat). Unless you
can re-cut the seat (tap re-seating tools are
available for purchase or hire) then I'm afraid the
tap becomes a write-off. Unfortunately you won't
know until the valve is removed. |
|
9. |
It is for this reason
that a manual inspection of the valve is a
worthwhile exercise. Not only can you properly
identify the valve you need as a replacement, you
also get to inspect the condition of the valve seat.
Disappointing as discovering a write-off may be,
look on the bright side - you have saved wasting any
more time and money on repair and your old tap is
off an out of the way ready for a new one to be
fitted in its place. |
|
10. |
Reinstating your sink
and taps to former glory is a matter of going
backward through whichever steps have proved
necessary during repair. Continue to protect shiny
surfaces from damage as you tighten nuts. If a taps
has been substantially loosened or removed it is
often a good idea to apply a little silicone between
the tap body and the sink to act as a gasket -
padding the two surfaces with a leak-proof seal.
Connect your supply pipe if it has been removed
making sure you fit the sealing washer. Tighten, but
don't over-tighten. Open your service valve slowly
reintroducing water and inspect for weeps or leaks.
|
|
11. |
All being well you are
back in business. |
|
Notes:
|
a)
Always use proper tools. Don't try using grips where
a spanner is required. Tools were designed for a
purpose. Don't be a bodge-artist.
b)
Inspect your valve and valve seat. If you are happy
that the valve seat is in serviceable condition
compare your valve to those we offer as a suitable
replacement and get your order underway.
c) Advice given here can only be in general terms
and is provided to help you. Whether you choose to
use advice or not, no liability will be accepted for
consequences that may arise. Never undertake a job
unless you feel able and competent. Always turn off
your water supply.
d) There will always be exceptions. We apologise if
details here do not match your installation exactly.
Please treat any advice in the spirit has been given
- to be helpful! |
| |
At the end of the day
you are always welcome to call for advise.
Click here for further information and to visit
the website.
|
