What we need to know
Obtaining a quote for custom made shower
screens and doors is a fairly simple process. All we need are a few
key measurements.
Here are a few simple guidelines to help
you help us.
Back to top of page
|
There are essentially three types of shower door
and shower enclosure available.
|
1. A framed shower enclosure door
As the name suggests is
fully framed. This is to say it has framework all the way around the
door. So, for example, a pivot door might have an
outer frame in which the pivot door is mounted, but the pivot door
itself may in some instances be framed as well.
(Note: Although designed to work with framed doors,
many fixed side and inline panels available these days are in fact
semi-frameless. i.e. Framed door with semi-frameless fixed panel)
Advantages/Disadvantages:
A
framed enclosure has a somewhat heavier appearance than its counterparts.
Modern design tends to favour the lighter weight appearance of frameless
and semi-frameless models. Frames offer adjustment within the profiles
that attach them to walls which is useful if your walls aren't
perpendicular.
|
.jpg) |
2. A frameless shower enclosure
As the name
suggests - there is an absence of framework. Fully frameless shower doors and
enclosures are popular with minimalists as their appearance is
unobtrusive. But, no enclosure is truly without metalwork. Such an
enclosure requires bracing bars and hinges/runners which can vary in shape and
function.
Advantages/Disadvantages:
Appearance - A
frameless design is celebrated by minimalists.
Popular concept in modern bathroom design as the lack of metalwork makes the
enclosure less obtrusive, but the positives can be outweighed by the
negatives.
Disadvantages - Precious little
or no adjustment. Out-of-true walls can be a nightmare. Glass must be
cut to exact size and shape. Once made, toughened glass cannot be
altered. Clip on bubble seals that rely on compression are often
ineffective, laborious to keep clean and become dated spoiling the
intended appearance. If you decide on fully frameless make sure you
purchase from a shower specialist. Many have-a-go glazing shops lack the
experience in this specialist area and might well be avoided.
|
.jpg) |
|
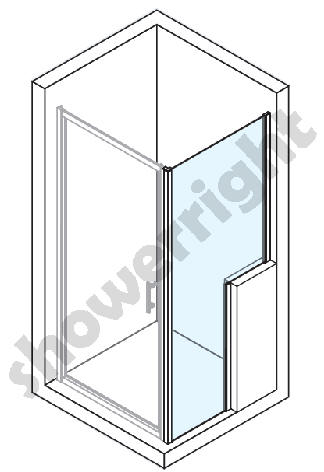
3. A semi-frameless shower enclosure
This is a hybrid of the
previous two types. Generally, the top and bottom of each panel will be
frameless, but the sides (left and right) will have metal profiles
that facilitate adjustment - crucial for alignment.
Wall profiles and magnetic door seals offer
excellent water retention properties and the over all appearance
is more subtle than a fully framed design.
Semi-frameless is a good choice if you need
a door that is shorter than the height of the user. No
horizontal framework means there's nothing to duck under or hit
your head or face on when entering and exiting the shower.
Advantages/Disadvantages:
Considered by many to be
the ultimate combination. More
subtle than the fully framed counterpart giving an attractive minimalist
appearance with all the advantages of adjustment that their
fully framed counterparts offer.
High quality magnetic water
seals on doors. |
.jpg) |
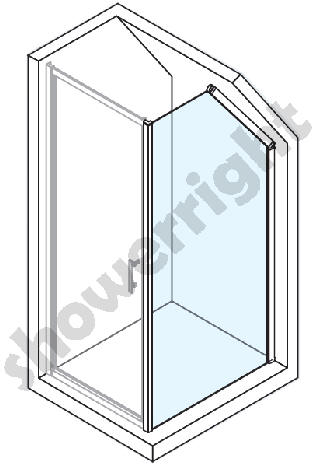
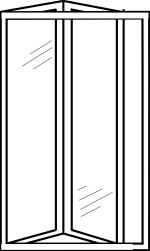
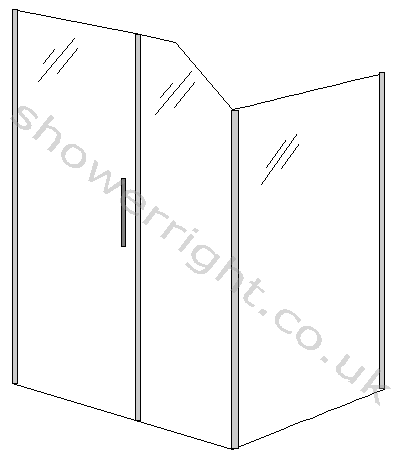
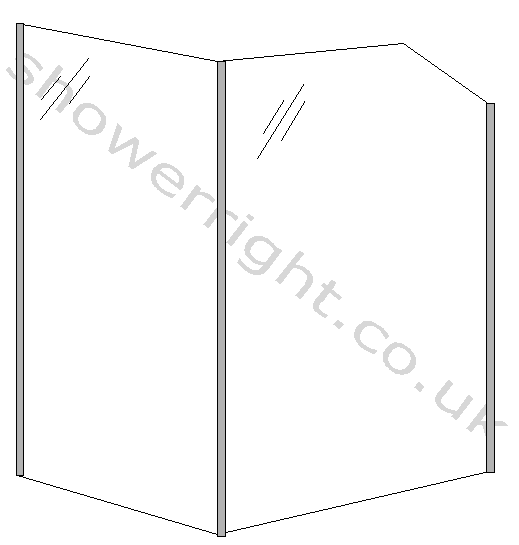
Bespoke shaped shower enclosures

Above: Semi-frameless shower enclosure comprising a
hinged door with fixed inline angled panel. Ideal for loft spaces.
Back to top of page
|
An alcove can easily be transformed into a
designer shower area with the simple addition of a shower tray (or wet
floor), door (and inline
panel if necessary) across the opening.
|
The height
Shower trays are commonly used to create a
shower. This is not intended as a statement of the obvious, there are other
methods such as a wet room.
If you are using a shower tray remember
that the shower door and/or panel will sit on the top of
the edge of the tray. This might be considered obvious
but it is surprising how many people overlook this fact - measuring
instead from the floor to describe the entire opening.
For this reason
the tray should be fully and securely fitted before measuring. No matter
how good you are an estimate will not suffice. When angles are involved
there is little or no forgiveness if you should make a mistake.
It is of
paramount importance that your vertical measurements are from the top of
the tray, after all, this is where the door and/or panel will sit.
The type and height of the tray are more or less
irrelevant (beware of upstands and tiling lips and never include them in
your measurements) provided the vertical measurement is taken from the surface
upon which the door will sit.
Only issues that might have a bearing on
what you want us to make should factor into your description. This
normally precludes what you are covering the bathroom floor with, or
other decorative features!
|
Measuring for an angled
ceiling in an alcove
You should measure from the
rim (top) of the shower tray up the wall to the point where the angle of the ceiling begins.
This is a critical measurement that will assist in establishing the
angle of the slope.
On the other side of the alcove you should measure
up the wall to a point corresponding to your chosen door/enclosure height. A horizontal
measurement is required from this point across to the sloping ceiling.
We need to establish where a horizontal line will strike the slope. This is
another critical measurement that will help to establish the
angle of the sloping ceiling.
|
|
Planning your custom shower
construction
While it might be considered good planning
to order your bespoke shower door as early as possible, don't be too
hasty. Consider how you intend to install your custom built unit.
For example, do you intend to tile or are
you going to use some form of wall covering? Has that part of the job
been completed?
Do you:
1. intend to install your shower door then tile up
to it? or
2. will you tile then install the shower door on the surface of
the tile? (the more popular option)
There is little point measuring the width
of an opening before tiling if you intend to install on the surface of
the tile later - hence narrowing the effective opening. Tiles vary in
thickness as will the layer of adhesive holding them.
The dimension of the opening can be
significantly reduced by the tiling process, so beware of falling into
this trap. Only measure after the walls are finished.
|
|
Good
advice:
Walls in buildings are
rarely perpendicular, flat or square. For this reason you should
take several sample measurements at different heights across the
width of an alcove to determine whether the gap is constant or
if the walls are running out of true.
If you intend to order
totally frameless glass (not recommended) then it will need to be cut to suit the
opening exactly. This is to say, if the opening tapers then the glass
will need to be cut to suit the shape of the aperture. Accurate
measurements are therefore essential.
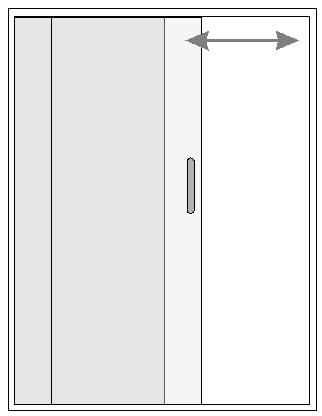
Doors and panels that
are framed or semi-framed will generally have a degree of adjustment
within the wall profile. While this is useful for
micro-adjustment and out-of-true walls it should not be used to compensate for poor
measuring.
Vertical measurements
need to be taken from the top of the shower tray after it is fully
installed. Approximations will not do.
 If your opening tapers you should establish which (if any) of
the walls are square (perpendicular) to the tray. So long as we
know there shouldn't be a problem.
If your opening tapers you should establish which (if any) of
the walls are square (perpendicular) to the tray. So long as we
know there shouldn't be a problem.
Do not guess or assume
Because you might be using a 1200 shower
tray it does not follow that your door width must be 1200. It is
usual when walls are tiled that the lowest tile will overlap
(sit on) the edge of the tray, so the thickness of the tile and
its adhesive layer could significantly reduce the dimension.
Accordingly, your finished aperture and therefore
your door must be slightly smaller than the apparent tray size.
Wait until you can be sure of the aperture you wish to
enclose before
measuring for your door. DO NOT GUESS.
Back to top of page
|
Choosing a door height and type for an awkwardly
shaped area can sometimes involve compromise. What you'd like and what
is possible may not go hand in hand.
Rarely will an 'off the shelf' item work, which
means custom design and bespoke manufacture are likely to be necessary.
What is possible will determine the basis for your
shower enclosure design, so establishing a few 'ground rules' will help
from the outset.
We are unable to offer
angled shower doors.
Your design must therefore incorporate a
door with a rectangular shape. Angled inline and side panels can be
added as required.
Minimum widths. Manufacturing constraints
and practicality determine certain minimum sizes. The minimum possible
width for a door will depend on the style and type.
For example, a
semi-frameless outward opening hinged door is 570mm (but this
would leave zero adjustment. Its
framed counterpart would have an absolute minimum width of 600mm (again leaving zero adjustment).
Choose a semi-frameless bi-fold door and the minimum
door width is 580mm, in a framed version 600mm. As
you can see the different designs and styles all have different size
constraints.
Important: Don't assume just
because a door has a minimum width of 580mm that it will fit in a 580mm
aperture. This might sound odd, but walls in buildings are rarely
perpendicular to the shower tray/floor or parallel to each other. This
is why doors and panels have adjustment - to compensate for the
imperfections of construction. Even if your walls are 'pretty good and
fairly parallel are they square (perpendicular) to the tray?
Doors can usually be made shorter, or in some
instances taller. Depending on whether you require a framed or
semi-frameless design the available options change. For example, custom
height bi-fold doors may be available in a framed design but not
semi-frameless.
How tall? This brings us to a
very important issue when selecting the height of a bespoke shower door. Be careful if your design calls for a short door
in a framed
design. A framed enclosure will have a horizontal cross-member
above the door, so make it too short and you risk injury as you enter
and exit the shower (the frame might hit you in the face). If the door needs to be short it may be better to
opt for a semi-frameless design where possible which lends itself to such a scenario as
it has no horizontal framework to
cause obstruction.
Sliding shower doors - A semi-frameless design cannot be offered in
a sliding door model - as there's no framework on which to support the
sliding mechanism for the door.
Inline panel considerations. Custom fixed
inline panels will always be semi-frameless. This is to say they will
not have framework top or bottom regardless of whether they are to be
used with a framed or semi-frameless door. There may also be
manufacturing constraints (minimum widths) depending on style. Best to
ask.
An angled panel cannot be
manufactured to a point
Manufacturing constraints dictate that a flat is
required at the top which must be at least
100mm. Shown in the diagram below as dimension 'E'.
|
.gif) |
Things we all need to know
The diagram to the left shows the
key key dimensions we need to know and therefore what
you must consider.
Beginning at the top, Dimension
F must equal the minimum door width plus at least
100mm for the flat on top of the inline panel.
Dimension D is the sum of
the door width and the inline panel
width and must be in excess of the minimum sizes
manufacturing constraints determine.
Providing you can achieve 'D' you
will need to determine how tall/short 'A' must be in
order to achieve 'F' where there is a sloping ceiling.
Given the example (left), as you
reduce the enclosure height (Dimension A) the width
across the top (Dimension F) increases.
It might be prudent to begin
planning by seeing how tall and enclosure will be in
order to achieve Dimension F. |
|
Back to top of page
|
Having covered matters of minimum size above you
might consider aesthetics and the practicalities of different types of
shower door. Available space will often
determine what will work best.
Consider the swing
of an outward opening pivot or hinged door and whether it might collide
with something like a towel warming rail, WC pan or sink when opening.
If a hinged shower door will open inward, is there
enough room for you and the swing door inside the shower?
Will the way the door opens interfere with access
or escape from the room? Will the swing of the door facilitate easy
access to the shower or become an obstacle to be negotiated?
|
|
Bi-folding door
Maybe a bi fold door takes your fancy?
Bi-folding shower doors are designed to hinge and fold
inward, but for safety we can offer models that will open outward in an
emergency should access be required. There are essentially two types - framed and semi-frameless.
Framed bi-fold doors usually run in tracks top and bottom. These tracks
guide the door while opening/closing and prevent it from swinging.
Bi-fold doors are available in a
semi-frameless design. While the doors are designed to fold inward they
have the additional benefit of being able to fold outward for emergencies - a nice feature. Bi-folding doors start at around 600mm width.
Only the framed bi-fold model can be shortened. We presently cannot
offer custom heights in a semi-frameless bi-fold door.
|
 |
|
|
Hinged or pivot door?
A
hinged door is quite literally hinged at the extremity of the panel,
whereas a pivot door rotates on a pivot point located some 70mm or so
from the panel's edge.
A pivot door is nearly always fully framed (the
frame being necessary to provide a pivot point top and bottom). With a pivot door it
could be argued that you actually loose a certain amount of the entry
dimension due to the inset location of the pivot, but by the same token
the arc of the door is slightly reduced thereby reducing the projection
when open.
A hinged door offers maximum entry width as the hinge is located at the outermost
point.
With a few exceptions, hinged and pivot doors
generally open outward. |
|
|
Sliding Door
A sliding door is popular for many reasons. It is a
great way to enclose a particularly large shower tray or alcove. A
sliding door is great if you have limited space or if the swing of an
outward opening
door might collide with fixed obstacles.
Sliding doors are not economical in the way
they offer access. For example, when a 1000mm double sliding door is opened
you don't get 500mm access as you might expect. Although one
door slides behind the other it never does so fully so the resulting
entry dimension will be less than half.
|
 |
Saloon Style shower doors
This style of door opens outwards,
but because each panel is only half the width of the
opening the swing of each door is minimised accordingly
making it a good choice in small spaces or when the
swing of a full size door or other
bathroom fixtures in proximity to the shower present
themselves as obstacles.
The height of saloon doors can
be customised. |
 |
|
|
|
Back to top of page
|
Coloured frames
If there is a frame profile (or part thereof) then
most likely there will be a colour option. Not all colours are available in
all types, but colours can include white, silver, chrome and matt black.
From time to time manufacturers introduce exotic colours but these are
limit to certain ranges and invariably return to the time-honoured
favourites.
Back to top of page
There are many old wives tales about how thick
glass should be. In reality there are factors that will determine the ideal
thickness of glass in a shower door or screen. The thicker the glass the
heavier (and more expensive) it becomes, but this does not make it
better per se. It might be fair to say that a
door with very thin glass might be perceived as flimsy, but going to the
opposite extreme does not manifest quality.
Glass used in shower doors and screens has a single
function - to prevent water and spray from escape. Building Regulations
determines shower enclosure glass must
be toughened. This is a legal safety requirement. While thicker glass may feel
more substantial, all regulation safety glass is toughened and resilient to knocks.
It could be argued that very thick glass can be
unwieldy to move. The weight of a heavy door can place immense
stress on hinges and rollers, but as a large frameless fixed panel in a walk in shower for
example it might offer structure and rigidity. So there is a happy medium.
Manufacturers will
vary the thicknesses of glass used in accordance with need, making unframed
glass panels thicker than say framed and curved glass doors.
As a very loose rule of thumb, 4mm glass is
generally at the limit of the thinner end of the thickness spectrum and
used with framework than will add to strength and rigidity, whereas 6mm
and 8mm glass are at the premium end for doors. A possible exception to
this might be curved glass used in quadrant doors that derives its
strength from its shape and need not be so thick. 10mm glass is sometimes
used in large fixed glass screens but not so often in shower doors. 10mm
glass is incredibly heavy.
Whether an enclosure is framed or frameless will
also factor into whether the glass needs to be thicker. A frame offers
strength and support to thinner glass whereas a frameless panel relies
entirely on the thickness of the glass for strength.
Back to top of page
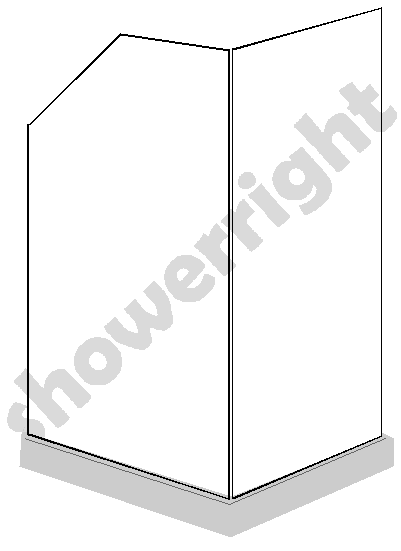
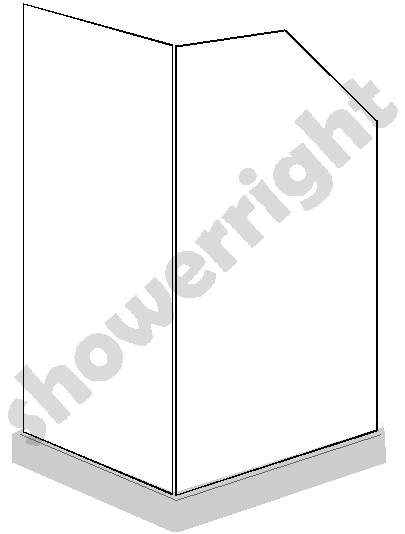
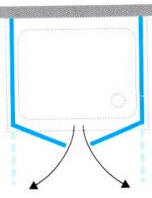
Measuring for a corner cubicle when the ceiling
slope requires a little more ingenuity because you have no vertical line to
measure from on the outer corner. There are however ways to help overcome this.
As with the procedure explained for an
alcove installation, you must be mindful of wall coverings (tiles etc).
Although your shower tray might measure say 1200 x 900, by the time you
have tiled the walls down onto the top of the tray you will have lost
the thickness of the tiles and adhesive from each of those dimensions.
A corner and a sloping ceiling can produce a couple
of different scenarios. The two diagrams below attempt to show each:
A corner where the fixed end panel
is at the short end and the door takes up part of the
other side.
|
A corner where the door may be
located in either the tall end or the angled side. The other
panel being fixed.
|
|
This option has been withdrawn
 |
 |
Back to top of page
|
|
|
As always, measuring is the most technical task.
The outer corner of the tray won't of course have
anything for you to measure to or from.
Here is a method you might chose to help in your
quest
1. A useful way to overcome this issue is to select
a nice straight edge (a wooden baton maybe) that can be used to simulate where the corner of your enclosure
will be. Cut the straight edge/baton to length so that it reaches
from the corner of the tray to the ceiling and temporarily secure it in
place.
2. Using a spirit level as a guide, you need to
ensure that the baton is
perfectly vertical and square to the tray.
3. Measure up the baton and make a mark at the
height you require the door/screen. (Refer to previous notes in regard
to minimum sizes and door types)
4. A horizontal measurement must now be taken from
the point you have marked on the temporary baton across to the sloping
ceiling. It is imperative that the distance is measured on the perfect
horizontal as any error will adversely affect the angle to be
calculated.
5. If it is difficult or impossible to use a spirit
level for this stage you can always measure up vertically from the tray
by the same amount as you mark the baton thereby establishing a point on
the sloping ceiling from which the horizontal can be measured.
6. If necessary, repeat these operations along the
other side of the tray if required.
Note: You might be gifted with the
knowledge or blessed with the equipment to establish the actual angle of
the sloping ceiling. But this is not what we need to know. |
.jpg)
For further assistance refer to
the design aids further down this page.
|
Back to top of page
Custom
side panels to create a corner or mid-wall shower enclosure
|
|
Side panels are available in semi-frameless
and fully frameless designs. Fixed side panels can be supplied
with numerous custom features including: |
Reduced height shower
screen suitable for a
dwarf wall for example.
|
A custom width (and/or height)
shower side panel suitable for a stub wall
|
|
 |
 |
|
Shower screens are available
with standard 'end on' fixings or lateral 'side on'
fixings. Examples of 'end on' and 'lateral' fixing
options (viewed from above) can be seen below: |
|
.gif)
'End on' wall fixing |
.gif)
'Lateral' wall fixing |
|
Shower side panel with an angled top
|
Flag shaped shower side panel
|
|
 |
 |
|
Inline shower extension panels
|
Multiple shower cubicle dividing panels
|
|
.gif) |
.jpg) |
|
Please refer to the Design Aid
section further down this page that will help you draw
and provide the requisite information needed to produce
a quotation. |
|
|
Back to top of page
There are certain things you cannot do
when you design a shower to fit an awkward area, such as a room with a
sloping ceiling.
1. You cannot open a door into the slope
of the ceiling.
Think about it... as the ceiling height diminishes
the door will collide. Make sure your design does not require something
impossible.
2. Some doors simply
cannot be messed about with.
Pivot and hinged doors can be manufactured to
custom heights and widths. Some Bi-fold and sliding doors cannot.
We can offer framed sliding doors and framed
bi-folding doors in bespoke sizes (height & width), but we cannot offer
bespoke heights in semi-frameless bi-folding doors (and semi-frameless
sliding doors don't exist).
We no longer offer doors of any type with angles
cut into them.
If your
design must cater for a sloping ceiling make sure the
slope is taken care of by using an angled fixed panel.
3. An angled inline panel may be
incorporated on
either side of a door.
Generally, an angled inline panel may be designed to go either side of a
framed door. If your enclosure is a semi-frameless design it is no
possible to support the door from the angled inline panel. There may be some exceptions so you are welcome to ask about the
feasibility of your idea.
4. If you need a
reduced height door consider whether
a framed design might become an
inconvenience.
Having a shorter door sounds simple enough, but
remember, if the door has a frame then the frame will be shorter too.
Will this place the cross member above the door at a dangerous or
inconvenient height? Maybe a semi-frameless design would be better as
there is no horizontal framework to worry about.
'Frameless fixed panels' invariably
require bracing bars to ensure the panel
cannot flex. When designing a reduced height enclosure consider this
requirement. Different types of bracing bars are available to ensure
they remain as unobtrusive as possible.
Please don't hesitate to call for
more specific advice.
5.
Words of caution
We are aware
that some 'have-a-go' glass retailers (typically found in the High Streets of
villages and towns) are attempting to supply bespoke shower doors -
usually the frameless type because they are unable to offer otherwise.
Be careful commissioning bespoke shower doors from people who do not
respect or understand the dynamics and operational requirements of building a
functional glass shower enclosure. Just because it looks like one doesn't mean
it will work like one.
A fully frameless product must be made to fit
exactly as there is little or no adjustment for alignment or out-of-true
walls. Compression seals must press against adjacent
surfaces to work or your shower will leak like a sieve. As pretty and appealing
as they might be, fully frameless shower doors and screen rarely work
well. Wall brackets have little or no adjustment. If you are determined that fully frameless is the way to go, make
sure the glass is toughened (this is a Building Regs requirement) for safety and
coated to resist lime scale.
See below for design
aids to help you present your requirement
Back to top of page
As you will see, a few simple measurements
taken carefully is all we need to produce a bespoke shower enclosure to
suit most awkward spaces.
You don't need to be an artist or an
engineer, just a simple sketch will often suffice providing it contains the
information needed to make your idea a reality.
To help in the process
we have produced some design aids (below). Just click on the image that
is closest to your requirement and a pre-drawn design page will open.
Print the page, place the requisite dimensions in the boxes provided and send it to us
for a no-obligation quote.
Send us your design by Email or Post
and we will produce a no-obligation quotation. Then, if you wish to
proceed with an order we will produce artwork for your final approval.
You might be very
surprised how affordable a bespoke shower enclosure actually is!
Click here to
Contact us
|
To assist you get a quote, we have
produced several design templates. Simply click on the one that resembles
your requirement, print it, fill in the details and send it back to us.
The design aid will explain what we need to know in
order to raise the quotation.
Click a picture to open a design aid.
Choose the one that most closely resembles your requirement. A new window will open in Adobe
as a PDF. Print the page and follow the guidance notes.
It is difficult to produce an aid
for every possible scenario. If you cannot use these aids
because your space or requirement differs greatly please don't
hesitate to call
for assistance and/or provide a simple sketch of what you
need.
|
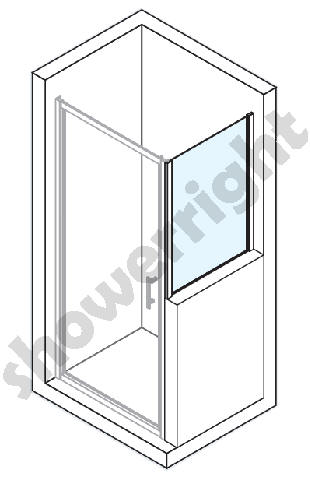
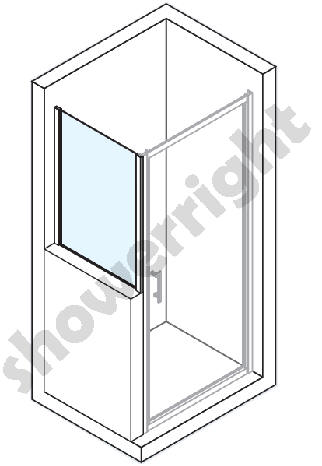
1. Alcove door (with
inline panel if required) |
|
|
|
|
|
|
|
|
|
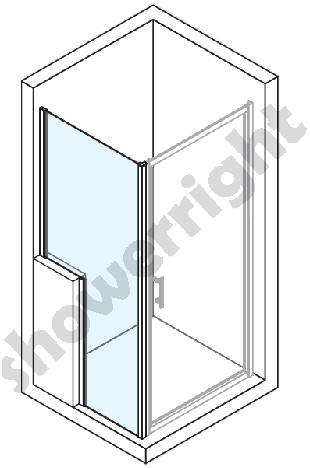
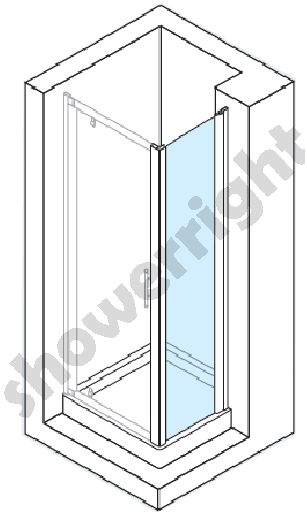
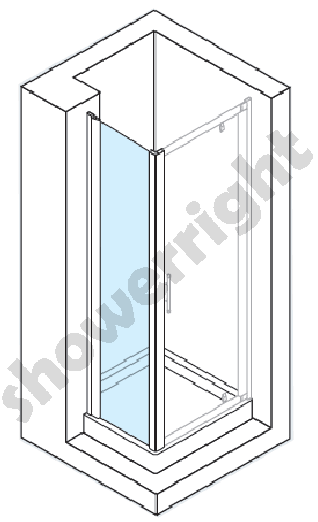
2. Corner shower enclosure |
|
|
|
|
|
|
|
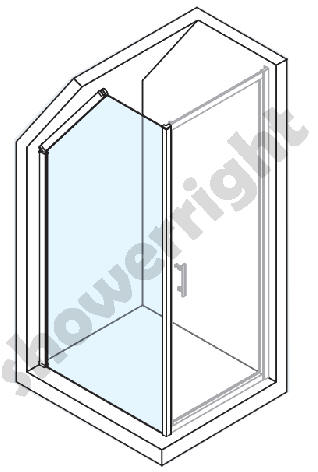
3. Corner shower enclosure
(fixed
return panel at short end of angled panel) |
|
This style has been
withdrawn |
|
|
This style has been
withdrawn |
|
|
|
|
|
4. Side panel with
angled top
(plus your choice of
door) |
|
|
|
|
|
|
|
5. Flag shaped side
panel
(plus your choice of
door) |
|
|
|
|
|
|
|
6. Side panel for a
dwarf wall
(plus your choice of
door) |
|
|
|
|
|
|
|
7. Custom side panel
(with Standard or Lateral fixing)
(plus your choice of
door) |
|
|
|
|
|
|
|
8. Custom inline and
dividing panels |
|
|
|
|
|
|
|
|

.gif)
.gif)