A Wet room
floor drainage gully
It might sound obvious,
but a wet room shower floor needs a means
for the water to drain away. This simple yet
important fact is the
starting point for planning your wet room -
the drainage gully.
It is surprising how many people overlook
this fairly obvious requirement, focussing
more on appearance than functionality.
Establish where you
intend to dispose of your waste water and
how you intend to get it there. No good
realising that water won't run up hill half
way through the job, or that you haven't got
enough depth to accommodate a water trap or
pipe work! Check your levels.
You should also
consider what type of shower equipment you
plan to install. No good putting in a system
that throws a monsoon of water at you if the
drain can only handle a meagre flow rate.
There is plenty going
on below floor level so you need to consider
what type of floor you have and what you
will need to install to make things work.
For example, is it a suspended timber floor
or is it solid with say a screed finish?
No matter what type of
floor you have there is usually a
solution, but think about it at the
conceptual stage and you won't end up with
awkward problems to overcome.
The floor construction
determines which type of drainage gully will
be best for the job.
Although your objective
(to create a fall towards the drain) will
always be the same no matter what type of
floor you have, the components you will use
can differ quite a lot.
Installing to a timber floor...
You can 'have a go' at
creating the slope yourself. After all, what
could be that difficult? Well, you might be
surprised. To create a strong, durable,
constant yet subtle slope from the perimeter
of your shower area to the drainage gully
can be a feat of engineering. Your slope
must arrive at a gully at the correct level
which must be fixed securely at a convenient
location. All of this must sit on the joists
supporting the surrounding floor and must
never move or flex. OR...
You might be better off
using what is known as a preformed 'Floor
Former'.
These are available in
a comprehensive range of sizes and shapes.
Depending on how large a shower area you
want formers can be one-piece or in multiple
segments. They take the guesswork out of
this complicated task ensuring you get the
perfect slope and an outlet into which you
secure your waste gully. Installation is
simple. When installing to an existing
timber floor you lay the former where you
wish to position your shower area. Mark
around the former then remove it. Cut out
the area you have marked - exposing the
joists. Insert your floor former in place of
the removed floor boards. Depending on the
product some will sit directly on the
exposed joists, others require you to
under-board between the joists thereby
creating a flat level surface on which to
sit the former. Once fixed down the former
(which is manufactured to be the thickness
of a standard floor board) simply takes the
place of the floor you have removed, but now
it has a perfect pre-formed slope towards
the gully outlet.
Installing to a solid floor...
In most cases you can
still use a floor former fitted into a
rebate in the floor that you excavate,
bedding it in so the top edge of the former
aligns with the surface of the surrounding
floor. OR...
You can use a drainage
gully specifically designed for you to
screed up to. You simply establish an area
in which you will create your shower area,
install your drainage gully setting it to a
slightly lower height, then screed between
using a plaster's trowel. When the screed
hardens you have a sloping area ready for
the tanking membrane to be applied with the
gully drain wherever you have decided to set
it. Once again, a simple installation.
In all installations
you will need to make provision for the
waste pipe from the drainage gully. With a
timer floor this might be between, under or
through floor joists. With a solid floor
this is likely to require excavation of a
channel in which to run the drainage pipe.
Always make sure the waste pipe maintains a
positive fall along its length.
Wet room
floor coverings and gully types
In the main, there are
two popular types of floor covering - a
tiled finish or a non-slip vinyl. Which one
you choose will have an effect on the gully
type you must use. For example, if you are
planning to tile the floor you would use a
square or linear shaped drainage gully. If
you intend to use vinyl it is best to use a
round gully. The reasons are fairly simple.
-
Square and Linear
drainage gullies. It is
easier to cut a tile in straight lines,
hence square and linear shaped gullies
lend themselves with their straight
edges. The tiles are cut to butt up to
the gully frame and the edges finished
with silicone and/or grout.
-
Round drainage
gullies.
With vinyl, to ensure perfect
water tightness the floor terminates at
a round gully under a circular
compression flange that squeezes down on
the edge of the vinyl to create a neat
water seal.
It is very
difficult to create the same watertight
integrity for vinyl using a square or
linear gully as there is no means to
clamp the edge in the same watertight
manner. The vinyl would need to be
adhered to the flange surrounding the
gully which over time may not remain
watertight.
Waterproof tanking membrane for a wet room
floor
When tiling a wet room
floor it is essential to use a waterproof
tanking membrane before you tile. We supply
TILESURE. The membrane adheres to
the timber floor or substrate. When
installed you can then spread your tile
adhesive directly on the surface of the
membrane and begin the process of tiling.
If you are using a
vinyl to cover the floor and shower area
this will act like a waterproof membrane so
there's no need for an additional membrane.
Take Care when using under-tile heating
If you intend to use
Under-tile Heating (a thin electrical
heating element) you would apply that after
you install the tanking membrane before
applying your tile adhesive (i.e. within the
adhesive layer). Great care should be taken
that the trowel does not nick or damage the
heating element when applying, spreading and
combing the adhesive. A metal trowel has
sharp edges that become sharper with use,
eventually presenting like blades. It is so
easy to cause damage to the heating element
without realising. This will result in
premature failure of the heating system. In
such an event you will have no choice than
to rip it all up and start again!
For this reason,
whenever you are applying tile adhesive over
an electrical heating element you should
consider using a plastic trowel. Care should
still be taken, but a plastic trowel is
unlikely to develop razor sharp edges.
You should check the
Wattage (W) of the heating element before
installation. A waterproof tanking membrane
will only tolerate so much heat before you
melt a hole in it!
The tanking membrane we
supply is called
TILESURE. This is capable of
handling 150W per square metre. This is a
market leading product.
If you have the luxury
of a wet underfloor heating system (a system
of pipes carrying hot water from your
household central heating boiler) it is
installed in a very different way (usually
installed within the slab of a solid floor
or between the joists of a timber floor),
will not reach such high localised
temperatures and will never come in direct
contact with the tanking membrane. Hence,
you need not worry about damaging the
membrane.
Ways to
drain a wet room shower floor
There are a couple of
basic ways to drain water from a wet room.
Either by gravity (allowing the waste water
to run down a pipe with a constant fall
towards a drain or with a shower waste water
pump (lifting and pushing the waste water to
a higher level).
You must decide
which method of disposal you will
use as the trap in the floor is
subtly different for each.
Generic examples of shower waste
gullies
Shown right:
A typical wet
floor waste will have a water trap
with an outlet spigot. Your waste pipe will
attach to the spigot and run to a
nearby drain or soil pipe. A constant fall must be
achieved in the pipe work so that
water will happily run down hill.
This is known as 'gravity' flow. |
 |
|
 |
Pictured left:
A 'pumped waste' doesn't use a
normal trap. It may use a very shallow device that
rather resembles a small frying pan.
The
'handle' of the pan is in fact a
small bore spigot onto which small
bore pipework can easily attach.
This is then connected to a remote
'self-priming' pump.
There are
specially modified shower trays and
floor formers that have the outlet
spigot built into their structure
thereby negating the need for the
'frying pan'. |
|
While there are
one or two exceptions to these examples (for example, when using
something like a Sanishower pump or
a Grundfos Sololift that will work
with the larger bore standard
pipework) you cannot swap between the two
easily. Another reason to plan
carefully. |
|
Shown right:
Another
variation is the 'waterless trap'.
A slightly
contradictory title as this device
does not have a water trap inside.
Instead, it has a membrane that
snaps open in the presence of water
and then closes when dry.
The
advantage of these would be the very
low profile extending below the
floor surface, but be careful where
you choose to use one.
Because they
do not offer a 50mm water separation
(to catch foul odours coming back
from a sewer) they may not meet
Building Regs if connecting directly
into a soil pipe or sewer. |
 |
|
A waterless
trap may be used if say you are
wasting into a gully outside the
building - but not connected
directly into a sewer.
Whichever
describes your scenario, remember to
match the flow rate of the shower
equipment to the flow handling
capabilities of the wet room floor
and gully setup. |
Shape of
a wet room shower gully
In general, there are
three shapes of tiled floor gully - Linear (a
long thin slot), Round or Square.
 |
 |
|
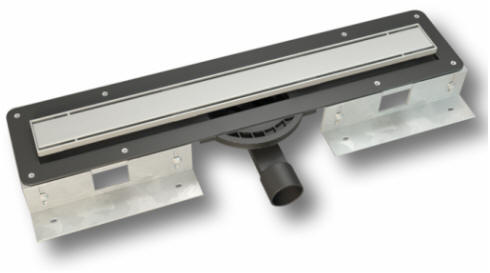
A linear gully
A long narrow
gully. Shown here with a single
outlet trap spigot. (the model shown is
for use in a screed floor but
without brackets will be used with
linear floor former). |
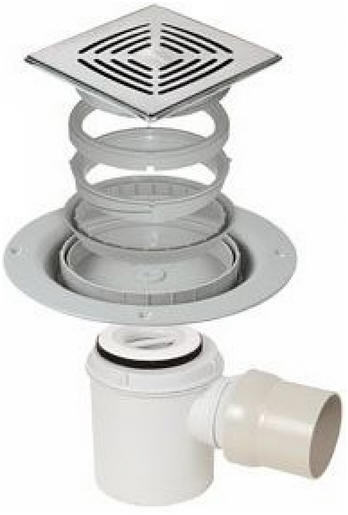
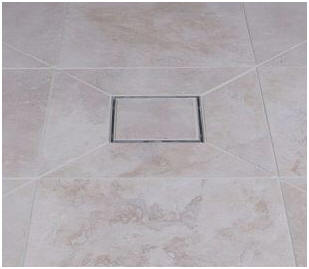
A square gully
Assembly showing
a typical square gully for use with
a floor former on a timber floor.
Picture shows a water trap with horizontal outlet spigot. |
|
|
|
 |
 |
|
Screed floor square
gully outlet
For a tiled floor
surface for a screed floor. There are
variants of this gully including a
'tile inside' gully cover. |
A round gully
Round gullies tend
to be used with vinyl
floor coverings such as Altro
waterproof non-slip. The edge of the
vinyl clamps under ring to form a
neat watertight edge. |
|
|
What type of wet room floor gully to choose
The type of gully you
choose for your wet room floor is more often
than not purely aesthetic. However, drainage gullies with
straight edges lend themselves to a tile finish
more so than a round gully, simply because
straight cuts are easier with tiles than curves.
Conversely, a gully with straight edges does
not have the means to clamp the edge of a
vinyl floor covering so a round gully is
preferred for this type of surface.
Before choosing between a square or linear
gully consider how each will impact on the
task of tiling.
|
A square gully
will invariably have four slopes
converging on it. (See picture
right)
A degree of skill
will be required when cutting all
the angles.
For this
reason, it is often considered that
small tiles are better suited to a
square gully as they are easier to
manipulate and more forgiving.
The image
(right) shows the numerous mitre
cuts necessary. The gully cover is a
rebated type that accepts a tile,
thereby blending into the
surrounding floor making it less
obtrusive than say a stainless
cover. |
 |
Linear gullies
lend themselves better to the use of large
tiles.
Whether a linear gully
is situated tight to a wall or away from the
wall you will find large tiles generally
require fewer cuts. tend to have a slope to the front and
another to the rear (there are exceptions -
especially on very large shower areas that
employ a linear drain). This can often
simplify the cutting of large tiles as there
are no difficult angles to cut. (exceptions
being larger areas with linear drains that
may still require angular tile cuts at the
corners)
Don't be fooled into
thinking that a linear drain can handle a
higher flow rate per se . Flow rate
is highly dependent on a number of factors -
capability of gully, size of waste pipe,
fall on waste pipe to drain, etc. A linear
drain with the same outlet size as a square
drain will only handle the same flow rate. A
bigger catchment area does not necessarily
equate to a better flow. It is however fair
to say that some Linear drains can be
equipped with additional outlets (the
Novellini Linear drain
for example) that can increase the flow
handling potential considerably.
a range of
square and linear gullies for a screed floor
with a tiled surface.
A range of
floor formers formers with linear and square
gullies for a tiled floor and round gullies
for vinyl.
Pumped
waste for a wet room shower floor
|
When a wet room
floor is lower than the drain into
which it will dispose of its waste
it is likely that a waste pump will
be necessary.
Depending on
available space and the distances
(vertical and horizontal) involved,
various pumps may prove suitable. It
must be said, if there is any way to
avoid using a waste pump then
consider it well before electing to
use one. Why add a mechanical device
and a significant cost to something
physics is only too happy to do for
nothing? |
|
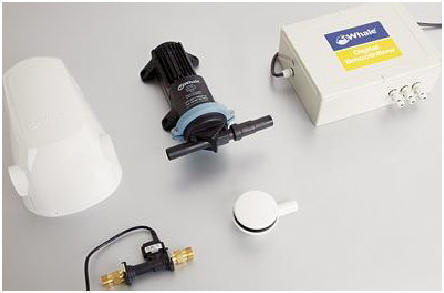
Pictured
right: A Dry Dec 20
shower waste pump installed within a
wall behind an access panel.
The picture
shows the pump, its control box (the
brain), the two flow sensors located
in the hot and cold supply pipes to
the mixer shower equipment and a
small canister that absorbs any
shock waves created when the pump is
scavenging for water.
This is a
top end setup capable of handling
high flow rates.
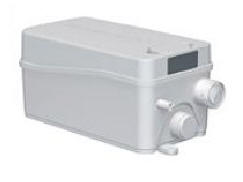
Smaller
lower rated pumps are available with
examples below: |
 |
Remember, evaluate what
flow the pump must handle before buying or
installing. If your pump can't keep up with
the flow rate of your shower you will end up
with a flood.
Shower waste pumps are
normally activated on a signal from flow
sensors placed in the supply pipes to the
shower equipment. Mixer showers have two
sensors (one in the hot supply, one in the
cold supply). Electric showers, having only
a cold water supply only have one sensor.
The more sophisticated
the pump and the higher the flow handling
capability the more expensive the unit will
be. For more detail please don't hesitate to
call.
To Conclude
Be mindful of a few
simple things when planning and installing
and all will be well. Remember what goes in
(or on) must go out (down the drain).
Gravity plays a major part so ensure slopes
run the correct way. It really isn't rocket
science but you will get caught out if you
choose to ignore the simple
principles. |